はじめに
バックエンドの藤岡です。
Firebase Admin SDKのカスタムクレームを使ってみたので、備忘録として使い方をまとめておきます。使用環境はWebを想定しています。
今回は、ユーザーがサインアップした段階でCloud Functionsでカスタムクレームを付与するワークフローを紹介します。
カスタムクレームについて
カスタムクレームは、Firebase Admin SDKでサポートされているユーザーに付与されるカスタム属性です。Firebaseアプリで、ユーザータイプごとのアクセス制限などを実装することができます。
一般的なユースケースは以下のようなものになります。
- データにアクセスできる管理者権限の付与
- ユーザーが属するグループの設定
- 有料、無料アカウントの区別
- ユーザータイプの付与
参考:カスタムクレームとセキュリティルールでアクセスを制限する


前提知識
- Firebase Authenticationの基礎知識
- Cloud Functionsの基礎知識
- Admin SDKの基礎知識
- Typescriptの基礎知識
前提条件
- Firebaseプロジェクトを立ち上げている
- Firebase Authenticationを用いた認証システムを作っている
- Cloud Functionsを初期化している
バージョン
- firebase@9.10.0
- Typescript v.4.8.2
本ドキュメントではFirebase Authenticationによる認証を作っており、Cloud FunctionsのAdmin SDKでプロジェクトの紐付けができているという前提の元で書きます。Firebaseプロジェクトの立ち上げ方や、Firebase Authentication、Cloud Functionについては以下の公式ドキュメントをご参照下さい。
全体構造
ユーザーのサインアップからカスタムクレーム付与までの流れは以下のようになります。
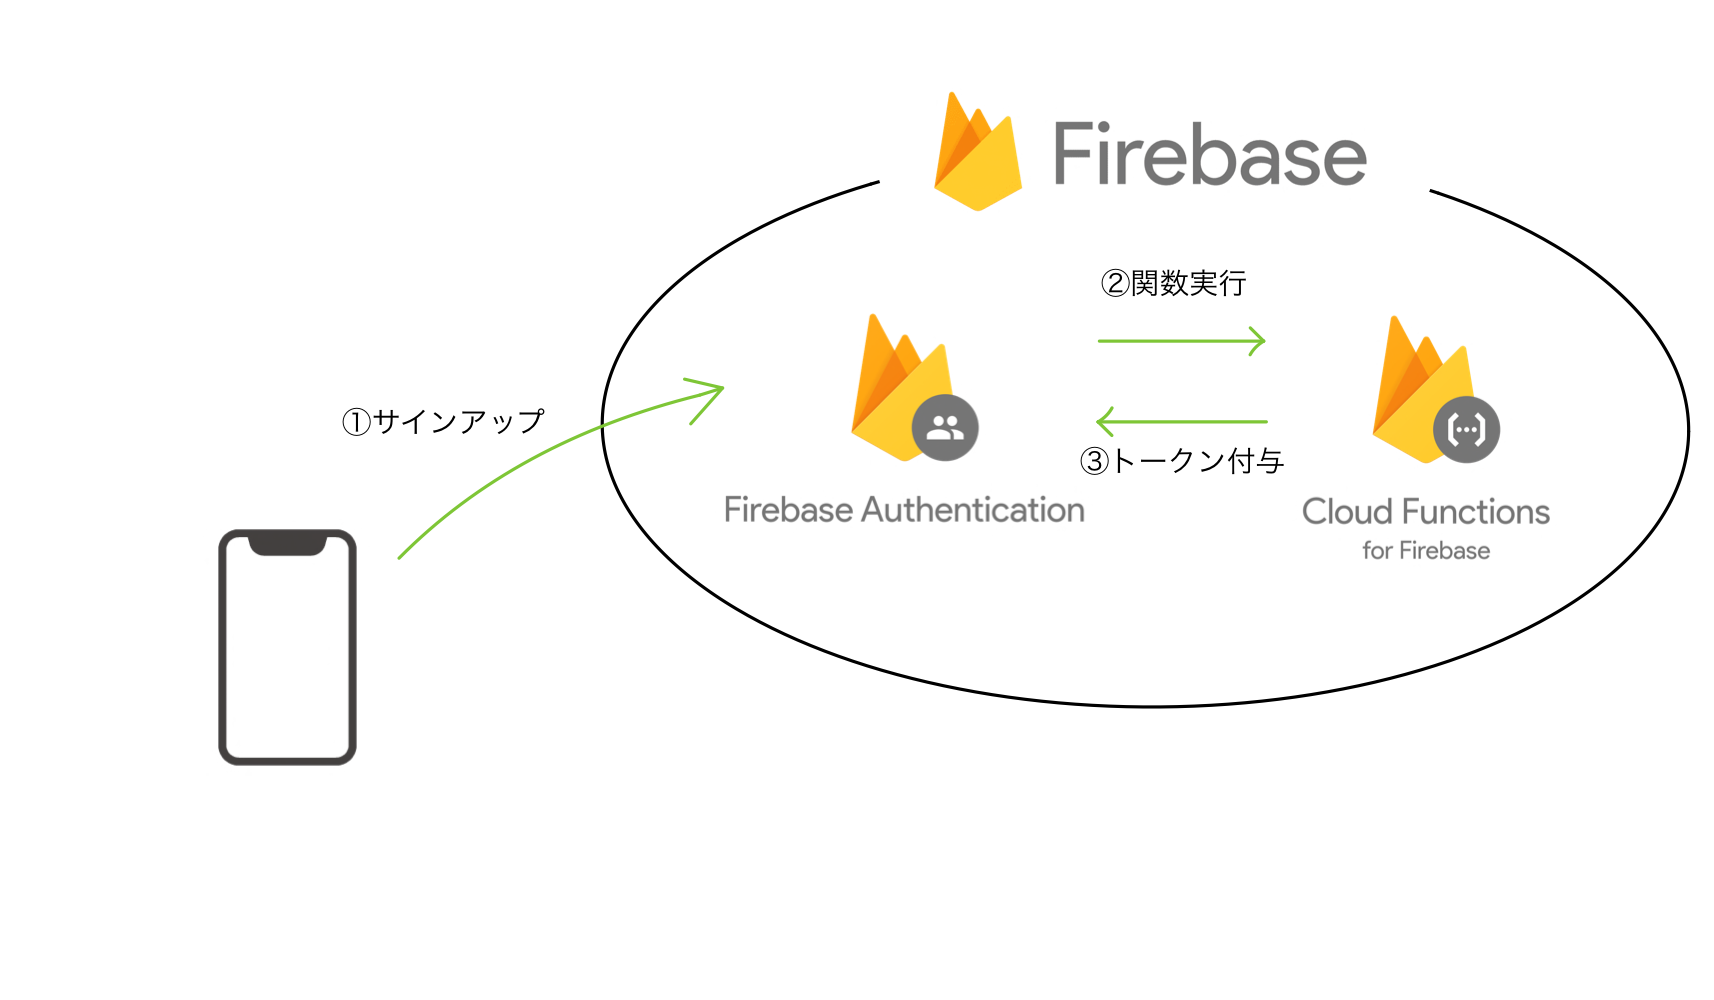
- Firebase Authenticationを使用したサインアップ
- Cloud Functionsがサインアップを感知して関数実行
- サインアップしたユーザーにクレーム付与
今回は、学内で使うサービスを想定し、サインアップ時にユーザーのメールアドレスから教師ユーザーか学生ユーザーか判別し、ユーザータイプに応じたクレーム teacher または student を付与していきます。
サインアップと同時に実行する関数の作成
作成ディレクトリはCloud Functionsのメインファイルです。デフォルトでは index.ts です。
まず初めに、必要なモジュールをインポートしてアプリを初期化します。
// index.ts
// Cloud Functions for Firebase SDKのインポート
const functions = require('firebase-functions');
// Firebase Admin SDKのインポート
const admin = require('firebase-admin');

// アプリの初期化
admin.initializeApp();参考:https://firebase.google.com/docs/functions/get-started
次に、ユーザーのサインアップをトリガーとする関数 initUserを作成します。これにはfunctions.auth.user().onCreate() を使用します。
// index.ts

const functions = require('firebase-functions');

// ...

export const initUser = functions
  .auth.user()
  .onCreate((user, context) => {
  	// ...
  });
onCreate の第一引数には、ユーザーがサインアップしたタイミングで実行されるコールバック関数を渡します。このコールバック関数の引数には、サインアップしたユーザーについてのデータが入っている user と、 ユーザーの認証状態やイベントタイプなどのデータが入っている context が渡されます。 型はそれぞれUserRecordとEventContextです。
参考:https://firebase.google.com/docs/functions/auth-events
ユーザータイプの判別
onCreate の第一引数の中に、サインアップしたユーザーが教師ユーザーなのか学生ユーザーなのかの判別をする部分を書きます。ここは色々な書き方があると思われますが、今回はEmailアドレスから判別するものにしておきます。
// index.ts

// ...

export const initUser = functions
  .auth.user()
  .onCreate((user, context) => {
    // ユーザータイプの判別
    const userType = user.email?.endsWith("@teacher.example.com")
      ? "teacher"
      : user.email?.endsWith("@student.example.com")
      ? "student"
      : "unknown";
  });
本来であれば、 "unknown" の部分はエラーにしたり、特定のドメインのメールアドレスしか受け付けないようにしたりとするべきなのですが、今回は簡単にこのようにしておきます。
カスタムクレームの付与
最後に、ユーザータイプに応じたカスタムクレームを付与していきます。
// index.ts

import { getAuth } from "firebase-admin/auth";

// ...

export const initUser = functions
  .auth.user()
  .onCreate( async (user, context) => {
    // ユーザータイプの判別
    const userType = user.email?.endsWith("@teacher.example.com")
      ? "teacher"
      : user.email?.endsWith("@student.example.com")
      ? "student"
      : "unknown";

    // 付与するクレーム
    const customClaims = {
      userType: userType,
    };

    try {
      // userにカスタムクレームを付与
      await getAuth().setCustomUserClaims(user.uid, customClaims);
      functions.logger.info(`${user.uid}に${userType}が付与されました`);
    } catch (error) {
      functions.logger.error(`error: ${error}`);
      throw new functions.auth.HttpsError(
        "unknown",
        String("error:" + error)
      );
    }
  });
カスタムクレームの付与は getAuth().setCustomUserClaims(uid, customClaims) で行います。第一引数に付与対象となるuidを渡し、第二引数には付与するカスタムクレームを渡します。
これで、サインアップしたらユーザータイプを判別し、判別したタイプをカスタムクレームとしてユーザーに付与することができました。
参考:https://firebase.google.com/docs/auth/admin/custom-claims
最後に全文を載せます。
// index.ts

import { getAuth } from "firebase-admin/auth";

// Cloud Functions for Firebase SDKのインポート
const functions = require('firebase-functions');
// Firebase Admin SDKのインポート
const admin = require('firebase-admin');

// アプリの初期化
admin.initializeApp();

export const initUser = functions
  .auth.user()
  .onCreate( async (user, context) => {
    // ユーザータイプの判別
    const userType = user.email?.endsWith("@teacher.example.com")
      ? "teacher"
      : user.email?.endsWith("@student.example.com")
      ? "student"
      : "unknown";

    // 付与するクレーム
    const customClaims = {
      userType: userType,
    };

    try {
      // userにカスタムクレームを付与
      await getAuth().setCustomUserClaims(user.uid, customClaims);
      functions.logger.info(`${user.uid}に${userType}が付与されました`);
    } catch (error) {
      functions.logger.error(`error: ${error}`);
      throw new functions.auth.HttpsError(
        "unknown",
        String("error:" + error)
      );
    }
  });
余談
今回使用した onCreate ですが、実行されるタイミングに少し癖があります。実行タイミングは”新規ユーザーが作成されたタイミング”です。そのため、今回のようなやり方で、
サインアップ→ユーザータイプのクレーム付与→クレームを用いた専用ページ表示
とやろうとすると、カスタムクレーム付与を実行するタイミングでクライアント側のサインアップは完了していることになります。したがって、今回 onCreate としたものを呼び出し可能関数とする、サインアップページを作成するなどの工夫が必要となります。閑話休題。
まとめ
今回はユーザーのサインアップをトリガーとしてカスタムクレームを付与する方法を紹介しました。もし何かの役に立つことがあれば幸いです。
![[Flutter]RetrofitでポケモンAPIを叩く](/content/images/2022/12/pokeapi_256.png)


